Basics:
Here we'll first learn below:

Note: Different values of the filter matrix will produce different Feature Maps for the same input image. As an example, consider following input image and the effects of convolution of the above image with different filters.

As shown, we can perform operations such as Edge Detection, Sharpen and Blur just by changing the numeric values of our filter matrix before the convolution operation [8] – this means that different filters can detect different features from an image.
In practice, a CNN learns the values of these filters on its own during the training process (although we still need to specify parameters such as number of filters, filter size, architecture of the network etc. before the training process).
The more number of filters we have, the more image features get extracted and the better our network becomes at recognizing patterns in unseen images.
To understand more on the 'Convolution', please check this link .
ReLU (Rectified Linear Unit):
ReLU stands for Rectified Linear Unit and is a non-linear operation.
This additional operation called ReLU is applied after every Convolution operation, to introduce Non-Linearity in image recognition. Rationale behind is to introduce non-linearity in our ConvNet, since most of the real-world data we would want our ConvNet to learn would be non-linear.
Note: Convolution is a linear operation – element wise matrix multiplication and addition, so we account for non-linearity by introducing a non-linear function like ReLU.

To be precise, it's an element wise operation (applied per pixel) and replaces all negative pixel values in the feature map by zero.

See in below example, original image, then image after 'Filter' applied and then image after 'ReLU' applied ( negative values are replaced by non-negative values).

Note: Other non linear functions such as tanh or sigmoid can also be used instead of ReLU, but ReLU has been found to perform better in most situations.
2). Pooling (Max here):
Pooling is taken to note particular/important features from the images, so that even if same object image, but in different position is analyzed, the recognition of the image still results correct output.
E.g. check below multiple cheetah images in various positions.

By definition, Pooling (also called subsampling or downsampling) reduces the dimensionality of each feature map but retains the most important information. Pooling can be of different types: Max, Average, Sum etc.
In case of Max Pooling, we define a spatial neighborhood (for example, a 2×2 window) and take the largest element (specific/major contributing feature) from the rectified feature map within that window. Instead of taking the largest element we could also take the average (Average Pooling) or sum of all elements in that window. In practice, Max Pooling has been shown to work better.


e.g. Pooling effect:

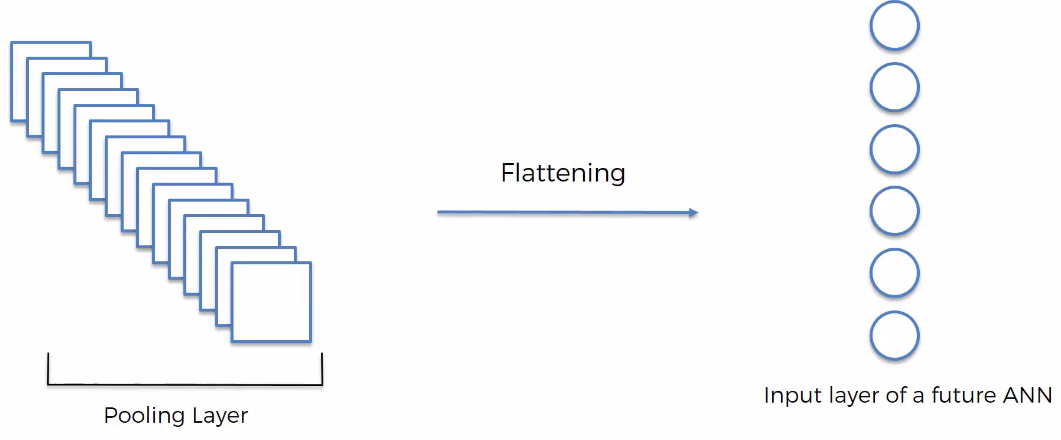
3). Flattening:
It's about converting matrix into columnar form.


4). Full Connection:
As described above, output from the convolutional, pooling and flatenning layers represent high-level features of the input image.
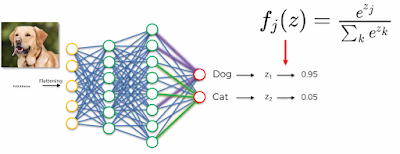
The purpose of the Fully Connected layer is to use these features for classifying the input image into various classes (Dog,Cat) etc based on the training dataset. Here on flatten results, a full ANN (Artificial Neural Network) is applied to get the output values.
Apart from classification, adding a fully-connected layer is also a (usually) cheap way of learning non-linear combinations of these features. Most of the features from convolutional, pooling and flattening layers may be good for the classification task, but combinations of those features might be even better.

The sum of output probabilities from the Fully Connected Layer is always 1. This is ensured by using the Softmax as the activation function in the output layer of the Fully Connected Layer.
The Softmax function takes a vector of arbitrary real-valued output scores (e.g. two y output values shown above) and then squashes them to a vector of values between zero and one that sum to one.

Summary:
C). Softmax & Cross-Entropy:
As mentioned above in Step 4, the sum of output probabilities from the Fully Connected Layer is always 1. This is ensured by using the Softmax as the activation function in the output layer of the Fully Connected Layer.
The Softmax function takes a vector of arbitrary real-valued output scores (e.g. two y output values shown above) and then squashes them to a vector of values between zero and one that sum to one.
Code: Convolutional Neural Network
# Installing Theano/Tensorflow/Kears (As in ANN)
# Part 1 - Building the CNN
# Importing the Keras libraries and packages
from keras.models import Sequential
from keras.layers import Convolution2D
from keras.layers import MaxPooling2D
from keras.layers import Flatten
from keras.layers import Dense
# Initializing the CNN
classifier = Sequential()
# Step 1.1 - Convolution
classifier.add(Convolution2D(32, 3, 3, input_shape = (64, 64, 3), activation = 'relu'))
# Step 1.2 - Pooling
classifier.add(MaxPooling2D(pool_size = (2, 2)))
# Adding a second convolutional layer
classifier.add(Convolution2D(32, 3, 3, activation = 'relu'))
classifier.add(MaxPooling2D(pool_size = (2, 2)))
# Step 1.3 - Flattening
classifier.add(Flatten())
# Step 1.4 - Full connection
# Here we are choosing 'Rectifier' (relu) as an activation function for Hidden Layer
# Here we are choosing 'Sigmoid' as an activation function for Output Layer
classifier.add(Dense(output_dim = 128, activation = 'relu'))
classifier.add(Dense(output_dim = 1, activation = 'sigmoid'))
# Compiling the CNN
# Here optimizer is 'Stochastic Gradient Descent'. One of the SGD Algoritm is 'adam'
# Here loss is 'binary_crossentropy' as result is binay (dog/cat). If there are more output loss would be 'category_crossentropy
classifier.compile(optimizer = 'adam', loss = 'binary_crossentropy', metrics = ['accuracy'])
# Part 2 - Fitting the CNN to the images
# Check Documentation here - https://keras.io/preprocessing/image/
from keras.preprocessing.image import ImageDataGenerator
train_datagen = ImageDataGenerator(rescale = 1./255,
shear_range = 0.2,
zoom_range = 0.2,
horizontal_flip = True)
test_datagen = ImageDataGenerator(rescale = 1./255)
training_set = train_datagen.flow_from_directory('dataset/training_set',
target_size = (64, 64),
batch_size = 32,
class_mode = 'binary')
test_set = test_datagen.flow_from_directory('dataset/test_set',
target_size = (64, 64),
batch_size = 32,
class_mode = 'binary')
# Here 'samples_per_epoch' is the number of images we have in out 'Training Set'
# Here 'nb_val_samples' is the number of images we have in out 'Test Set'
classifier.fit_generator(training_set,
samples_per_epoch = 8000,
nb_epoch = 25,
validation_data = test_set,
nb_val_samples = 2000)
Hope this helps!!
Here we'll first learn below:
- What are CNN
- Steps Involved in CNN
- Convolution Operation & ReLU (Rectified Linear Unit) Layer (Non-Linearity)
- Pooling
- Flattening
- Full Connection
- Softmax
- Cross-Entropy
Note: Two known computer scientist, most noted for work in Deep Learning.


Below is how CNN works at pixel level in 2D & 3D.
2D: A grayscale image, has just one channel. The value of each pixel in the matrix will range from 0 to 255 – zero indicating black and 255 indicating white.
3D: An image from a standard digital camera will have three channels – red, green and blue – you can imagine those as three 2d-matrices stacked over each other (one for each color), each having pixel values in the range 0 to 255.


B). Steps Involved in CNN:
1). Convolution:
Primary purpose of 'convolution' is find features in your image using 'Feature Detector'.
Here we try to make the image smaller by mapping the Input Image with a 'Feature Detector' (could be of 1*1, 2*2, 3*3, 4*4 and so on) and output a 'Feature Map'.
In CNN terminology, the 3×3 matrix is called a ‘filter‘ or ‘kernel’ or ‘feature detector’ and the matrix formed by sliding the filter over the image and computing the dot product is called the ‘Convolved Feature’ or ‘Activation Map’ or the ‘Feature Map‘. It is important to note that filters acts as feature detectors from the original input image.


- Geoffrey Hinton - Google
- Yann Lecun - Facebook
The above mentioned 4 steps/operations are the basic building blocks of every Convolutional Neural Network, so understanding how these work is an important step to developing a sound understanding of ConvNets.
A). What is CNN:
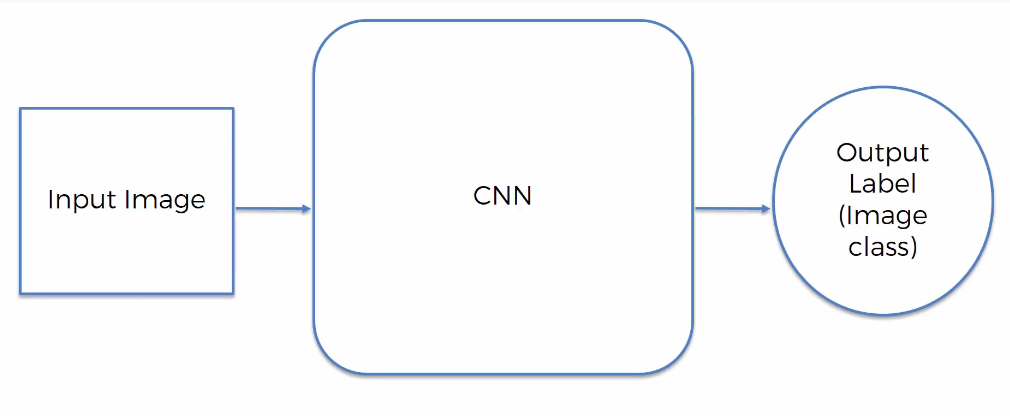
Convolutional Neural Networks (ConvNets or CNNs) are a category of Neural Networks that have proven very effective in areas such as Image recognition and Classification. ConvNets have been successful in identifying faces, objects and traffic signs apart from powering vision in robots and self driving cars.
CNNs use relatively little pre-processing compared to other image classification algorithms. This means that the network learns the filters that in traditional algorithms were hand-engineered. This independence from prior knowledge and human effort in feature design is a major advantage.
A CNN consists of an input and an output layer, as well as multiple hidden layers. The hidden layers are either convolutional, pooling, flattening or fully connected.

Below is how CNN works at pixel level in 2D & 3D.
2D: A grayscale image, has just one channel. The value of each pixel in the matrix will range from 0 to 255 – zero indicating black and 255 indicating white.
3D: An image from a standard digital camera will have three channels – red, green and blue – you can imagine those as three 2d-matrices stacked over each other (one for each color), each having pixel values in the range 0 to 255.


1). Convolution:
Primary purpose of 'convolution' is find features in your image using 'Feature Detector'.
Here we try to make the image smaller by mapping the Input Image with a 'Feature Detector' (could be of 1*1, 2*2, 3*3, 4*4 and so on) and output a 'Feature Map'.
In CNN terminology, the 3×3 matrix is called a ‘filter‘ or ‘kernel’ or ‘feature detector’ and the matrix formed by sliding the filter over the image and computing the dot product is called the ‘Convolved Feature’ or ‘Activation Map’ or the ‘Feature Map‘. It is important to note that filters acts as feature detectors from the original input image.


Note: Different values of the filter matrix will produce different Feature Maps for the same input image. As an example, consider following input image and the effects of convolution of the above image with different filters.
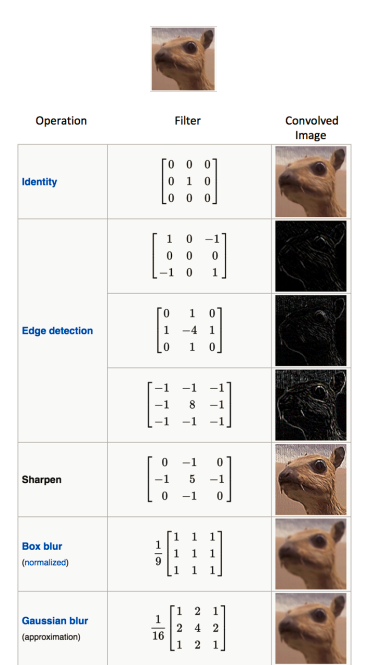
As shown, we can perform operations such as Edge Detection, Sharpen and Blur just by changing the numeric values of our filter matrix before the convolution operation [8] – this means that different filters can detect different features from an image.
In practice, a CNN learns the values of these filters on its own during the training process (although we still need to specify parameters such as number of filters, filter size, architecture of the network etc. before the training process).
The more number of filters we have, the more image features get extracted and the better our network becomes at recognizing patterns in unseen images.
To understand more on the 'Convolution', please check this link .
ReLU (Rectified Linear Unit):
ReLU stands for Rectified Linear Unit and is a non-linear operation.
This additional operation called ReLU is applied after every Convolution operation, to introduce Non-Linearity in image recognition. Rationale behind is to introduce non-linearity in our ConvNet, since most of the real-world data we would want our ConvNet to learn would be non-linear.
Note: Convolution is a linear operation – element wise matrix multiplication and addition, so we account for non-linearity by introducing a non-linear function like ReLU.

To be precise, it's an element wise operation (applied per pixel) and replaces all negative pixel values in the feature map by zero.

See in below example, original image, then image after 'Filter' applied and then image after 'ReLU' applied ( negative values are replaced by non-negative values).

Note: Other non linear functions such as tanh or sigmoid can also be used instead of ReLU, but ReLU has been found to perform better in most situations.
2). Pooling (Max here):
Pooling is taken to note particular/important features from the images, so that even if same object image, but in different position is analyzed, the recognition of the image still results correct output.
E.g. check below multiple cheetah images in various positions.

By definition, Pooling (also called subsampling or downsampling) reduces the dimensionality of each feature map but retains the most important information. Pooling can be of different types: Max, Average, Sum etc.
In case of Max Pooling, we define a spatial neighborhood (for example, a 2×2 window) and take the largest element (specific/major contributing feature) from the rectified feature map within that window. Instead of taking the largest element we could also take the average (Average Pooling) or sum of all elements in that window. In practice, Max Pooling has been shown to work better.


e.g. Pooling effect:

3). Flattening:
It's about converting matrix into columnar form.


4). Full Connection:
As described above, output from the convolutional, pooling and flatenning layers represent high-level features of the input image.
The purpose of the Fully Connected layer is to use these features for classifying the input image into various classes (Dog,Cat) etc based on the training dataset. Here on flatten results, a full ANN (Artificial Neural Network) is applied to get the output values.
Apart from classification, adding a fully-connected layer is also a (usually) cheap way of learning non-linear combinations of these features. Most of the features from convolutional, pooling and flattening layers may be good for the classification task, but combinations of those features might be even better.

The sum of output probabilities from the Fully Connected Layer is always 1. This is ensured by using the Softmax as the activation function in the output layer of the Fully Connected Layer.
The Softmax function takes a vector of arbitrary real-valued output scores (e.g. two y output values shown above) and then squashes them to a vector of values between zero and one that sum to one.

Summary:
- Convolution + Pooling + Flattening layers act as Feature Extractors from the input image while
- Fully Connected layer acts as a classifier.
C). Softmax & Cross-Entropy:
As mentioned above in Step 4, the sum of output probabilities from the Fully Connected Layer is always 1. This is ensured by using the Softmax as the activation function in the output layer of the Fully Connected Layer.
The Softmax function takes a vector of arbitrary real-valued output scores (e.g. two y output values shown above) and then squashes them to a vector of values between zero and one that sum to one.

Code: Convolutional Neural Network
# Installing Theano/Tensorflow/Kears (As in ANN)
# Part 1 - Building the CNN
# Importing the Keras libraries and packages
from keras.models import Sequential
from keras.layers import Convolution2D
from keras.layers import MaxPooling2D
from keras.layers import Flatten
from keras.layers import Dense
# Initializing the CNN
classifier = Sequential()
# Step 1.1 - Convolution
classifier.add(Convolution2D(32, 3, 3, input_shape = (64, 64, 3), activation = 'relu'))
# Step 1.2 - Pooling
classifier.add(MaxPooling2D(pool_size = (2, 2)))
# Adding a second convolutional layer
classifier.add(Convolution2D(32, 3, 3, activation = 'relu'))
classifier.add(MaxPooling2D(pool_size = (2, 2)))
# Step 1.3 - Flattening
classifier.add(Flatten())
# Step 1.4 - Full connection
# Here we are choosing 'Rectifier' (relu) as an activation function for Hidden Layer
# Here we are choosing 'Sigmoid' as an activation function for Output Layer
classifier.add(Dense(output_dim = 128, activation = 'relu'))
classifier.add(Dense(output_dim = 1, activation = 'sigmoid'))
# Compiling the CNN
# Here optimizer is 'Stochastic Gradient Descent'. One of the SGD Algoritm is 'adam'
# Here loss is 'binary_crossentropy' as result is binay (dog/cat). If there are more output loss would be 'category_crossentropy
classifier.compile(optimizer = 'adam', loss = 'binary_crossentropy', metrics = ['accuracy'])
# Part 2 - Fitting the CNN to the images
# Check Documentation here - https://keras.io/preprocessing/image/
from keras.preprocessing.image import ImageDataGenerator
train_datagen = ImageDataGenerator(rescale = 1./255,
shear_range = 0.2,
zoom_range = 0.2,
horizontal_flip = True)
test_datagen = ImageDataGenerator(rescale = 1./255)
training_set = train_datagen.flow_from_directory('dataset/training_set',
target_size = (64, 64),
batch_size = 32,
class_mode = 'binary')
test_set = test_datagen.flow_from_directory('dataset/test_set',
target_size = (64, 64),
batch_size = 32,
class_mode = 'binary')
# Here 'samples_per_epoch' is the number of images we have in out 'Training Set'
# Here 'nb_val_samples' is the number of images we have in out 'Test Set'
classifier.fit_generator(training_set,
samples_per_epoch = 8000,
nb_epoch = 25,
validation_data = test_set,
nb_val_samples = 2000)
Hope this helps!!
Regards,
Arun Manglick
No comments:
Post a Comment